
SR-IOV on OpenShift
Table of Contents
Introduction
At the moment of this writing, the big actors on 5G, are making a huge effort to transform their workloads to be deployed as cloud native apps. Part of this effort is to run those workloads as containers on top of a platform based on Kubernetes.
Other important challenge from Telco actors, is to interact as close as possible with the networking hardware, in order to reduce the latency during runtime. One of the industry standards involved to get this is SR-IOV.
During this article let’s try to explain what is SR-IOV, how it works on OpenShift and how to deploy workloads that use the advantage of it.
This article is not going to explain anything related with the Telco workloads, or walk you through the details on how the SR-IOV is implemented at hardware level, or even the software. The goal of this article is to introduce the use of SR-IOV on OpenShift, mainly focus for SRE or other technical roles involved on use OpenShift for Telco deployments, as architects, DevOps, platform engineers, etc. A lot of interesting articles already exist about this topic, but I like to share my experience on this and share some tips I found during my path.
What is SR-IOV
Single Root input/output Virtualization (SR-IOV) is a specification that allows the isolation in PCIe network devices, to create subsets of virtual interfaces called Virtual Functions (VF). This way in single physical devices (called Physical Function), it is possible to create at hardware level VFs.
Using SR-IOV devices, it is possible to have direct access to the Direct Memory Access (DMA) from the workload, which allow to get a low latency and better performance. In the case of virtualization allow the VM to interact directly with hardware via the PCI bus, and in the case of containers can be used DPDK for that, to interact directly with the hardware from the user space, instead of from the kernel space. The explanation of what is DPDK libraries and how works is not part of this article, but for sure that it is a very important topic that need to be understood by the reader. Some resource about DPDK are included at the end of the article if you are more interested on that.
Describe environment used for this article
The environment used for this article is a baremetal laboratory, compound by five Dell PowerEdge R450 nodes. Three of these nodes are the control plane nodes of the cluster, and the other two are worker nodes. The installation of the cluster is out of the scope of this article. You can refer to the OpenShift official documentation for that.
$oc get nodes,clusterversion
NAME                         STATUS   ROLES                  AGE     VERSION
node/master0.ocp1.r450.org   Ready    control-plane,master   7d22h   v1.27.10+c79e5e2
node/master1.ocp1.r450.org   Ready    control-plane,master   7d22h   v1.27.10+c79e5e2
node/master2.ocp1.r450.org   Ready    control-plane,master   7d22h   v1.27.10+c79e5e2
node/worker0.ocp1.r450.org   Ready    worker                 7d22h   v1.27.10+c79e5e2
node/worker1.ocp1.r450.org   Ready    worker                 7d22h   v1.27.10+c79e5e2

NAME                                         VERSION   AVAILABLE   PROGRESSING   SINCE   STATUS
clusterversion.config.openshift.io/version   4.14.16   True        False         7d22h   Cluster version is 4.14.16
The worker nodes have connected an Intel E810-XXV NIC on each one, which support SR-IOV.
How to use it on OpenShift
Now that we understand how SR-IOV works and why it is important for Telco deployments, let’s walk through how to use it on OpenShift.
As most of the implementations on Kubernetes or OpenShift, the main way to extend features of our cluster is via an operator. This is not an exception, there is a SR-IOV operator that allow us to configure everything via the Kubernetes API applying YAML manifest.
Install SR-IOV operator
The installation of the SR-IOV operator is straight forward using OLM. It is very well documented in the OpenShift official documentation, but let’s summarize in here how to do it using the oc CLI.
- Create the openshift-sriov-network-operator namespace:
$ cat << EOF| oc create -f -
apiVersion: v1
kind: Namespace
metadata:
  name: openshift-sriov-network-operator
  annotations:
    workload.openshift.io/allowed: management
EOF
- Create the OperatorGroup for the SR-IOV operator:
$ cat << EOF| oc create -f -
apiVersion: operators.coreos.com/v1
kind: OperatorGroup
metadata:
  name: sriov-network-operators
  namespace: openshift-sriov-network-operator
spec:
  targetNamespaces:
  - openshift-sriov-network-operator
EOF
- Create the Subscription:
$ cat << EOF| oc create -f -
apiVersion: operators.coreos.com/v1alpha1
kind: Subscription
metadata:
  name: sriov-network-operator-subscription
  namespace: openshift-sriov-network-operator
spec:
  channel: stable
  name: sriov-network-operator
  source: redhat-operators
  sourceNamespace: openshift-marketplace
EOF
- Verify the installation:
$oc get csv -n openshift-sriov-network-operator \
  -o custom-columns=Name:.metadata.name,Phase:.status.phase
Name                                          Phase
sriov-network-operator.v4.14.0-202405161337   Succeeded
Validate SR-IOV support on the NIC
As we already mentioned above, it is mandatory for using SR-IOV to have support at hardware level. The list of devices supported at the time of this writing are listed in the OpenShift official documentation. In the environment used to write this article are installed the Intel E810 NICs which support SR-IOV. But even the NIC support it, we have to ensure that it is enabled in the BIOS settings.
To ensure that the required configurations for the NIC are enabled, we need to connect to the server BMC, in our case iDRAC because is a DELL machine. From there, we have to open the Virtual Console, reboot our system from the Power options, and follow the next workflow:
- Press F2 (Enter System Setup)
- Clikc on Device Settings
- Select your devices from the list, in our case NIC in Slot 3 Port 1: Intel(R) Ethernet 25G 2P E810-XXV Adapter
- From this view enable SR-IOV within the Virtualization Mode, as show below in the pic
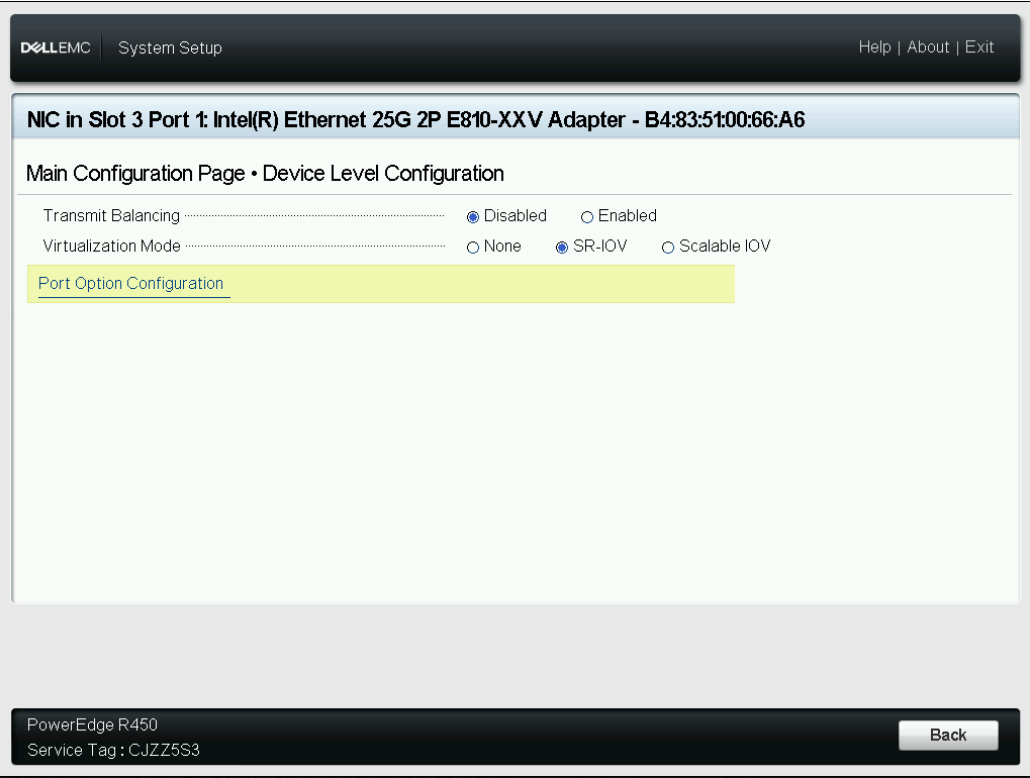
- Click on Finish until get the System Setup menu
- Click on System BIOS
- Click on Integrated Devices
- Ensure that SR-IOV Global Enable is Enabled as show below
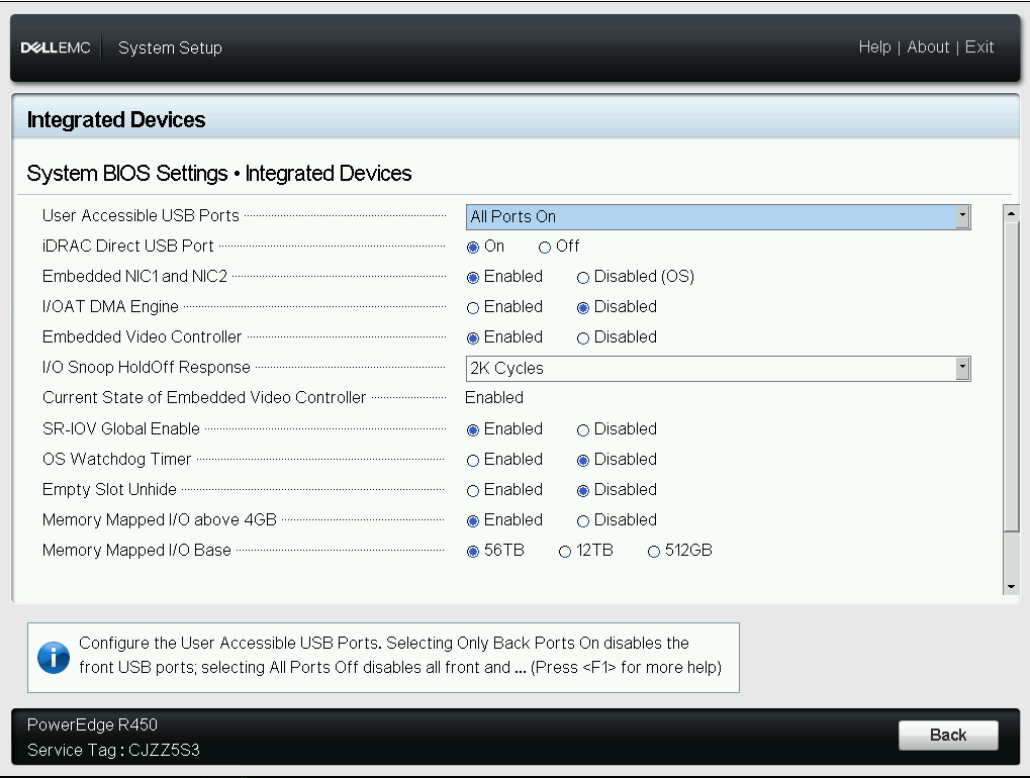
- Click on Back and Finish until a window ask for confirmation and then click on Yes
At this point we are sure that SR-IOV is enabled in our NIC. Now let’s see from the OS that the driver support it. In the below capture the output of the lspci command show the capabilities of the devices, and there we can see that the card support SR-IOV.
sh-5.1# lspci | grep E810
98:00.0 Ethernet controller: Intel Corporation Ethernet Controller E810-XXV for SFP (rev 02)
98:00.1 Ethernet controller: Intel Corporation Ethernet Controller E810-XXV for SFP (rev 02)
sh-5.1# lspci -s 98:00.0 -v
98:00.0 Ethernet controller: Intel Corporation Ethernet Controller E810-XXV for SFP (rev 02)
        Subsystem: Intel Corporation Ethernet 25G 2P E810-XXV Adapter
        Flags: bus master, fast devsel, latency 0, IRQ 18, NUMA node 1
        Memory at d4000000 (64-bit, prefetchable) [size=32M]
        Memory at d8010000 (64-bit, prefetchable) [size=64K]
        Expansion ROM at d1000000 [disabled] [size=1M]
        Capabilities: [40] Power Management version 3
        Capabilities: [50] MSI: Enable- Count=1/1 Maskable+ 64bit+
        Capabilities: [70] MSI-X: Enable+ Count=1024 Masked-
        Capabilities: [a0] Express Endpoint, MSI 00
        Capabilities: [e0] Vital Product Data
        Capabilities: [100] Advanced Error Reporting
        Capabilities: [148] Alternative Routing-ID Interpretation (ARI)
        Capabilities: [150] Device Serial Number b4-83-51-ff-ff-00-66-a6
        Capabilities: [160] Single Root I/O Virtualization (SR-IOV)
        Capabilities: [1a0] Transaction Processing Hints
        Capabilities: [1b0] Access Control Services
        Capabilities: [1d0] Secondary PCI Express
        Capabilities: [200] Data Link Feature <?>
        Capabilities: [210] Physical Layer 16.0 GT/s <?>
        Capabilities: [250] Lane Margining at the Receiver <?>
        Kernel driver in use: ice
        Kernel modules: ice
Concepts and configurations
The SR-IOV operator has two main functions:
- At the control plane level, it is responsible of:
- Network Resource Injector: when a new pod is created the SR-IOV operator mutate the resource to set the resource request, limits, annotations, labels, huge pages configuration, etc..
- Admission Controller: validate the values of the CR
SriovNetworkNodePolicyto ensure the correct behavior when it is applied to the cluster.
- At the worker level:
- Configure VFs: based on the
SriovNetworkNodePolicyCR, it configure the required VFs in the NIC (also called PF) using the SR-IOV capability.
- Configure VFs: based on the
The CR to configure the generic aspects of the operator is called sriovOperatorConfig. Most of the values should be keep it by default. Only the .spec.configDaemonNodeSelector should be modified with the label of the nodes that we want to use for SR-IOV. In the below capture we are using the workers . If in your cluster you have a custom label for the nodes where the workloads that will use SR-IOV will run, you have to update it.
$
(ocp1)[root@core-infra ~]$oc -n openshift-sriov-network-operator get sriovoperatorconfig default -ojsonpath='{.spec.configDaemonNodeSelector}' | jq
{
  "node-role.kubernetes.io/worker": ""
}
In the below capture it is shown the SR-IOV pods that run on each kind of node, the responsible of the control plane run on the control plane nodes, and the ones responsible to configure at the node level the VFs run on the worker nodes.
$oc -n openshift-sriov-network-operator get pods -o wide
NAME                                     READY   STATUS    RESTARTS   AGE     IP             NODE
network-resources-injector-4gwjq         1/1     Running   0          8d      10.128.1.247   master0.ocp1.r450.org
network-resources-injector-7b9hn         1/1     Running   1          8d      10.129.0.65    master2.ocp1.r450.org
network-resources-injector-kfljq         1/1     Running   0          8d      10.128.2.37    master1.ocp1.r450.org
sriov-device-plugin-5npwg                1/1     Running   0          6d19h   10.6.115.23    worker0.ocp1.r450.org
sriov-device-plugin-hkws8                1/1     Running   0          19h     10.6.115.24    worker1.ocp1.r450.org
sriov-network-config-daemon-stcmm        1/1     Running   2          7d17h   10.6.115.24    worker1.ocp1.r450.org
sriov-network-config-daemon-wfpnn        1/1     Running   2          7d17h   10.6.115.23    worker0.ocp1.r450.org
sriov-network-operator-78f967dfc-q9b7f   1/1     Running   0          8d      10.128.2.36    master1.ocp1.r450.org
Configure VFs
At this moment we can start with the creation of the VFs on each node that will be used by our workloads later on. The CR to create the VFs is called SriovNetworkNodePolicy. Let’s apply a configuration in our cluster as below:
$ cat << EOF| oc create -f -
apiVersion: sriovnetwork.openshift.io/v1
kind: SriovNetworkNodePolicy
metadata:
  name: sriov-ens3f1
  namespace: openshift-sriov-network-operator
spec:
  deviceType: netdevice
  isRdma: false
  nicSelector:
    pfNames:
    - ens3f1
  nodeSelector:
    node-role.kubernetes.io/worker: ""
  numVfs: 8
  priority: 10
  resourceName: sriov_ens3f1
EOF
Now we can validate it querying the CR sriovNetworkNodeStates.
$oc -n openshift-sriov-network-operator get sriovnetworknodestates.sriovnetwork.openshift.io
NAME                    SYNC STATUS   AGE
worker0.ocp1.r450.org   Succeeded     8d
worker1.ocp1.r450.org   Succeeded     8d
(ocp1)[root@core-infra ~]$oc -n openshift-sriov-network-operator get sriovnetworknodestates.sriovnetwork.openshift.io worke
r1.ocp1.r450.org -oyaml
apiVersion: sriovnetwork.openshift.io/v1
kind: SriovNetworkNodeState
metadata:
  creationTimestamp: "2024-05-30T09:34:38Z"
  generation: 5
  name: worker1.ocp1.r450.org
  namespace: openshift-sriov-network-operator
  ownerReferences:
  - apiVersion: sriovnetwork.openshift.io/v1
    blockOwnerDeletion: true
    controller: true
    kind: SriovNetworkNodePolicy
    name: default
    uid: 4ee856b0-028c-4ab5-8ac8-38a59cd7e350
  resourceVersion: "6204485"
  uid: fde9f5b3-1276-4470-b9c4-1ad74a512762
spec:
  dpConfigVersion: cef32a2c6cbd39dccbe4ec899f3961c4
  interfaces:
  - name: ens3f0
    numVfs: 8
    pciAddress: 0000:98:00.0
    vfGroups:
    - deviceType: netdevice
      policyName: sriov-ens3f0
      resourceName: sriov_ens3f0
     vfRange: 0-7
  - name: ens3f1
    numVfs: 8
    pciAddress: 0000:98:00.1
    vfGroups:
    - deviceType: netdevice
      policyName: sriov-ens3f1
      resourceName: sriov_ens3f1
      vfRange: 0-7
status:
  interfaces:
  - Vfs:
    - deviceID: "1889"
      driver: iavf
      mac: 26:6a:71:d5:76:98
      mtu: 1500
      name: ens3f1v0
      pciAddress: 0000:98:11.0
      vendor: "8086"
      vfID: 0
    - deviceID: "1889"
      driver: iavf
      mac: 5a:9c:12:c5:a9:cb
      mtu: 1500
      name: ens3f1v1
      pciAddress: 0000:98:11.1
      vendor: "8086"
      vfID: 1

#####   <PART OF THE OUTPUT OMITTED>

    - deviceID: "1889"
      driver: iavf
      mac: 5e:e8:dc:b5:28:b6
      mtu: 1500
      name: ens3f1v7
      pciAddress: 0000:98:11.7
      vendor: "8086"
      vfID: 7
    deviceID: 159b
    driver: ice
    eSwitchMode: legacy
    linkSpeed: 25000 Mb/s
    linkType: ETH
    mac: b4:83:51:00:66:a7
    mtu: 1500
    name: ens3f1
    numVfs: 8
    pciAddress: 0000:98:00.1
    totalvfs: 128
    vendor: "8086"
  syncStatus: Succeeded
The manifest applied above will create 8 VFs in the device ens3f1 on the nodes with label worker. So, let’s take a look if that happened in the node.
$oc debug node/worker1.ocp1.r450.org
Starting pod/worker1ocp1r450org-debug-j5mvd ...
To use host binaries, run `chroot /host`
Pod IP: 10.6.115.24
If you don't see a command prompt, try pressing enter.
sh-4.4# chroot /host
sh-5.1# ip link show ens3f1
7: ens3f1: <BROADCAST,MULTICAST,UP,LOWER_UP> mtu 1500 qdisc mq state UP mode DEFAULT group default qlen 1000
    link/ether b4:83:51:00:66:a7 brd ff:ff:ff:ff:ff:ff
    vf 0     link/ether aa:94:1c:3b:6c:79 brd ff:ff:ff:ff:ff:ff, spoof checking on, link-state auto, trust off
    vf 1     link/ether 9e:60:c6:85:dc:7b brd ff:ff:ff:ff:ff:ff, spoof checking on, link-state auto, trust off
    vf 2     link/ether 36:28:fe:31:0a:72 brd ff:ff:ff:ff:ff:ff, spoof checking on, link-state auto, trust off
    vf 3     link/ether f2:1b:59:70:3b:f3 brd ff:ff:ff:ff:ff:ff, spoof checking on, link-state auto, trust off
    vf 4     link/ether f6:42:ee:0f:73:79 brd ff:ff:ff:ff:ff:ff, spoof checking on, link-state auto, trust off
    vf 5     link/ether da:0e:29:9e:9c:bb brd ff:ff:ff:ff:ff:ff, spoof checking on, link-state auto, trust off
    vf 6     link/ether 56:f5:4d:b3:0e:0e brd ff:ff:ff:ff:ff:ff, spoof checking on, link-state auto, trust off
    vf 7     link/ether ae:6b:93:a1:ee:b8 brd ff:ff:ff:ff:ff:ff, spoof checking on, link-state auto, trust off
    altname enp152s0f1
sh-5.1#
As you can see in the capture within the PF ens3f1 there are 8 VFs. So it worked as expected, great!
Deploy workloads that use VFs as second interface
By default Kubernetes and OpenShift, when create a new pod, this is attached to the default CNI plugin cluster network, which is an internal network. In order to allow to add a second network interface to the pods, there is a CNI plugin called Multus, which comes installed by default in OpenShift.
Multus allow to add a second interface to our pods based in the content of a CR called NetworkAttachmentDefinition. Once this CR is configured, in the pod definition it is needed only some annotations to add the second network interface. For SR-IOV there is a CR called SriovNetwork which create the NetworkAttachmentDefinition automatically. In the below capture we are going to create a new SriovNetwork and afterwards a pod that will use that.
$ cat << EOF| oc create -f -
apiVersion: sriovnetwork.openshift.io/v1
kind: SriovNetwork
metadata:
  annotations:
    operator.sriovnetwork.openshift.io/last-network-namespace: openshift-sriov-network-operator
  name: sriov-ens3f1-vlan140
  namespace: openshift-sriov-network-operator
spec:
  networkNamespace: openshift-sriov-network-operator
  resourceName: sriov_ens3f1
  vlan: 140
EOF
Once applied the SriovNetwork CR, let’s check if the NetworkAttachmentDefinition is created as well.
$oc -n openshift-sriov-network-operator get network-attachment-definitions
NAME                   AGE
sriov-ens3f1-vlan140   8d
Now everything is ready to run a pod that use a VF created by SR-IOV operator. The important part of the below manifest is the annotation k8s.v1.cni.cncf.io/networks. The value of this annotation is the name of the SriovNetwork created before.
$ cat << EOF| oc create -f -
apiVersion: v1
kind: Pod
metadata:
  name: sample-pod
  namespace: openshift-sriov-network-operator
  annotations:
    k8s.v1.cni.cncf.io/networks: sriov-ens3f1-vlan140
spec:
  containers:
  - name: sample-container
    image: registry.access.redhat.com/ubi9/ubi@sha256:d31d3e5e92c0c47277c5011c0326b285ab7ae627eff036133be1dccc4208004d
    command: ["sleep", "infinity"]
EOF
Let’s see if our pod have a second interface connected.
$oc -n openshift-sriov-network-operator rsh sample-pod
sh-5.1# ip a s
1: lo: <LOOPBACK,UP,LOWER_UP> mtu 65536 qdisc noqueue state UNKNOWN group default qlen 1000
    link/loopback 00:00:00:00:00:00 brd 00:00:00:00:00:00
    inet 127.0.0.1/8 scope host lo
       valid_lft forever preferred_lft forever
    inet6 ::1/128 scope host
       valid_lft forever preferred_lft forever
2: eth0@if729: <BROADCAST,MULTICAST,UP,LOWER_UP> mtu 8900 qdisc noqueue state UP group default
    link/ether 0a:58:0a:82:00:cc brd ff:ff:ff:ff:ff:ff link-netnsid 0
    inet 10.130.0.204/23 brd 10.130.1.255 scope global eth0
       valid_lft forever preferred_lft forever
    inet6 fe80::858:aff:fe82:cc/64 scope link
       valid_lft forever preferred_lft forever
31: net1: <BROADCAST,MULTICAST,UP,LOWER_UP> mtu 1500 qdisc mq state UP group default qlen 1000
    link/ether 06:81:10:9d:9b:38 brd ff:ff:ff:ff:ff:ff
    altname enp152s0f1v4
    inet6 fe80::481:10ff:fe9d:9b38/64 scope link
       valid_lft forever preferred_lft forever
Awesome!! One last thing, let’s check the pod definition to review the mutations done by the SR-IOV operator.
$oc -n openshift-sriov-network-operator get pod sample-pod -oyaml                       [109/1961]
apiVersion: v1
kind: Pod
metadata:
  annotations:
    k8s.ovn.org/pod-networks: '{"default":{"ip_addresses":["10.130.0.204/23"],"mac_address":"0a:58:0a:82:00:cc","gateway_ip
s":["10.130.0.1"],"routes":[{"dest":"10.128.0.0/14","nextHop":"10.130.0.1"},{"dest":"172.30.0.0/16","nextHop":"10.130.0.1"}
,{"dest":"100.64.0.0/16","nextHop":"10.130.0.1"}],"ip_address":"10.130.0.204/23","gateway_ip":"10.130.0.1"}}'
    k8s.v1.cni.cncf.io/network-status: |-
      [{
          "name": "ovn-kubernetes",
          "interface": "eth0",
          "ips": [
              "10.130.0.204"
          ],
          "mac": "0a:58:0a:82:00:cc",
          "default": true,
          "dns": {}
      },{
          "name": "openshift-sriov-network-operator/sriov-ens3f1-vlan140",
          "interface": "net1",
          "mac": "06:81:10:9d:9b:38",
          "dns": {},
          "device-info": {
              "type": "pci",
              "version": "1.1.0",
              "pci": {
                  "pci-address": "0000:98:11.4"
              }
          }
      }]
    k8s.v1.cni.cncf.io/networks: sriov-ens3f1-vlan140
    openshift.io/scc: anyuid
  creationTimestamp: "2024-06-07T10:56:18Z"
  name: sample-pod
  namespace: openshift-sriov-network-operator
  resourceVersion: "6881260"
  uid: 7464bec1-130c-4bc2-bfac-71786f485d78
spec:
  containers:
  - command:
    - sleep
    - infinity
    image: registry.access.redhat.com/ubi9/ubi@sha256:d31d3e5e92c0c47277c5011c0326b285ab7ae627eff036133be1dccc4208004d
    imagePullPolicy: IfNotPresent
    name: sample-container
    resources:
      limits:
        openshift.io/sriov_ens3f1: "1"
      requests:
        openshift.io/sriov_ens3f1: "1"
    securityContext:
      capabilities:
        drop:
        - MKNOD

#### OUTPUT OMITTED
Take a look in the above capture to the content of the annotations, some additional ones have been added automatically, and also some resource limits. That’s the part handle by the Network Resource Injector and the Admission Controller WebHook.
Troubleshooting
One of the first steps for troubleshooting the SR-IOV configurations is to validate, as was mentioned previously, the CR SriovNetworkNodeStates. The output of this CR bring us a lot of information of the current devices and their configurations.
At a lower level, we can check the node it self. For instance we can take a look if the number of VFs has been set as expected.
sh-5.1# cat /sys/class/pci_bus/0000\:98/device/0000\:98\:00.0/sriov_numvfs
8
Another important thing that we can check is the current driver version used for the NIC.
sh-5.1# ethtool -i ens3f1
driver: ice
version: 5.14.0-284.55.1.rt14.340.el9_2.
firmware-version: 4.40 0x8001ba1e 22.5.7
expansion-rom-version:
bus-info: 0000:98:00.1
supports-statistics: yes
supports-test: yes
supports-eeprom-access: yes
supports-register-dump: yes
supports-priv-flags: yes
Conclusions
SR-IOV allow to virtualize network interface at hardware level, allowing a closer iteration from the workload running in a container or VM. Currently SR-IOV is supported on OpenShift via an operator which simplify the configuration of the VFs and the attachment of these VFs to our workloads.
Resources
SR-IOV from official OpenShift documentation
Definition of SR-IOV from Wikipedia
Some articles from different manufactures: